Archives by Month - June 2012
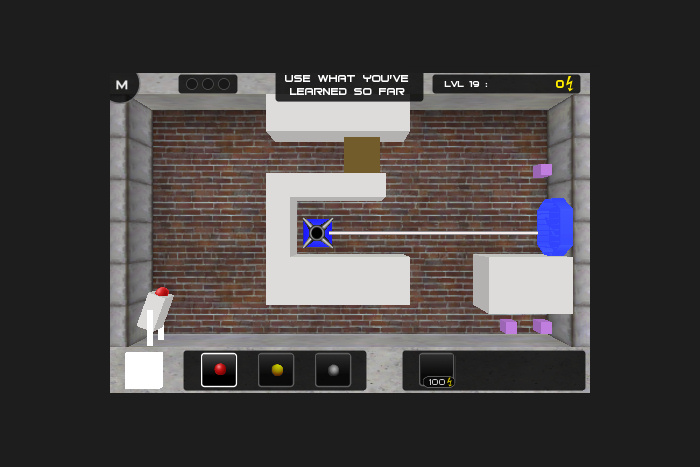
Screenshot Saturday number nine is here! This week I've been working on some actual graphics related content. I made the 3D model and textured the "target" object, which is the goal for scoring OddBalls in every level. I went through a few iterations to get something I liked, mostly because I added too much detail initially and forgot that the target was going to be so small once it's actually on the iPhone screen.
Eventually I settled on a fairly simple model that is a bit futuristic looking. It looks a bit like a pipe that will suck in OddBalls, and also a bit like an "X" to make it an obvious target. The underlining colour scheme has the electric blue that is found throughout the rest of the game (such as within the menu buttons, and eventually with the Energy Charges and effects). There are a few reasons for this, but the main reason is probably that you are collecting, managing and spending Energy throughout the game and I'm using blue and yellow to style Energy objects.
I've also started making a 3D model for my fan vents, but I haven't textured it yet. You can see one in today's screenshot (it's all blue right now), but eventually you will see the details of the grate and fan propeller. I'm having a bit of a newbie modelling issue right now trying to animate the propeller to rotate (I need the resulting model to be only 1 mesh so it remains 1 draw call in game, but it's hard to animate just part of a single mesh and not the whole thing when it's combined). Once I figure out that problem I will work on texturing it. Next I'll be working on models for the main cannon and also the anvil and umbrella powerups!
OddBall #screenshotsaturday #9
This entry posted by Graham
in Velvety Couch Games
| Comments (0)
Tags: Game Development, OddBalls, ScreenshotSaturday
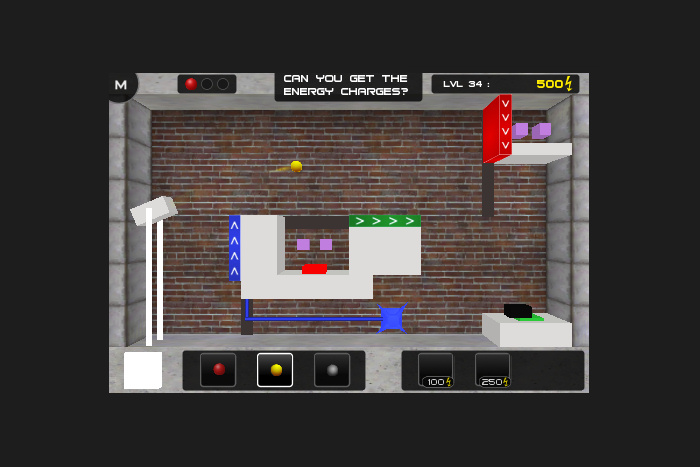
Another quick update for Screenshot Saturday number eight! This week I've completed a bunch more work on the level selection menu, re-added 20 levels into the list after re-arranging the orders and adding a few new levels, tweaked the level descriptions, added auto-saving of game progress and level scores, updated the menu graphics and various other behind-the-scenes stuff. Unfortunately, none of that work translates to new and different screenshots from what you've already seen. So today's image is from another level.
This level is easy to beat, but as usual you will likely want to beat it with as many points as possible which means collecting all or most of the Energy Charges. To get at the Energy Charges you need to use the Anvil Powerup. This ability makes an OddBall drop down swiftly like a heavy rock which enables it to depress buttons in the levels. In this level, there are 2 buttons that are each linked to a coloured moveable wall. If you depress the green button, the green wall will move and stay in its "open" position until the anvil is removed and the button is no longer depressed. The same goes for the red wall and button. Using the anvil ability costs 250 Energy Points, and you start with zero which means you will have to score one OddBall first to generate useable points. If all of that makes sense, you will now see that the trick of the level is that you only have 2 remaining OddBalls (because one is already scored and removed) to puzzle through 2 triggerable walls.
OddBall #screenshotsaturday #8
This entry posted by Graham
in Velvety Couch Games
| Comments (0)
Tags: Game Development, OddBalls, ScreenshotSaturday

Just a quick update for Screenshot Saturday number seven! I've been working hard on a dynamic menu system for the level selection screen in Oddball. As usual, menus have been a pain in the arse to code, but I'm making headway! I still need to tweak the level selection graphics and work in the ability to save player preferences in order to load scores and game progress (which will tie into the menu for showing and selecting levels). More on that next time!
OddBall #screenshotsaturday #7
OddBall #screenshotsaturday #7
This entry posted by Graham
in Velvety Couch Games
| Comments (0)
Tags: Game Development, OddBalls, ScreenshotSaturday
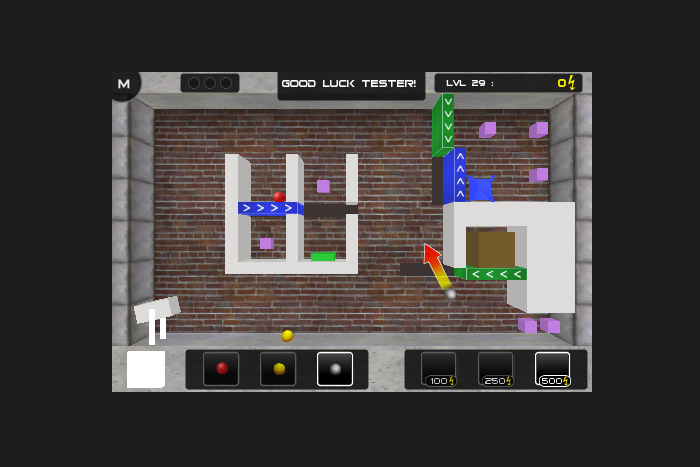
Here is Screenshot Saturday number six! I've done quite a bit of work on OddBall this week, but most of it has not been in the graphics department. Most of my game development time has been spent on reconfiguring my tutorials and levels.
Originally, I wanted to use a few quick tutorial levels at the start of the game to teach the player the basics and how to use all of the powerups and abilities. I could then throw the player into the "normal" game levels and they would have all of the powerups at their disposal for solving the puzzles. I managed to squeeze all of the desired instructions into 10 short tutorial levels (all of which were interactive and had the bare minimum for explanations). After tweaking these levels many, many times I was quite happy with how I managed to get so much information into relatively few levels. However, I then let some others test it out.
You see, as it happens many times with this sort of thing, I became too close to the work and lost perspective on how a truly new player would feel playing the tutorial for the first time. As you design, create, tweak, change, test, test, and test some more you learn all of the tricks. The levels you are constantly updating and testing become very easy to complete as a result. It becomes harder to judge the true difficultly those levels pose for the first time you play them. So I asked my girlfriend to be a testing guinea pig to see how the tutorial section really flowed. I immediately saw that she was expected to learn too many game strategies within a very short amount of levels. She did not have enough time to get a feel for all of the abilities, and was forced to use a new powerup as soon as she tried the last. Additionally, some of the tutorial levels were just too hard for a beginer of the game.
Clearly my initial idea of keeping the tutorial section short and sweet was not working out. So this week I went back to the drawing board. I reconfigured my level structure and basically got rid of the "tutorial section" completely. Now the player is simply playing the "normal" game levels all of the time. There is no tutorial section you need to graduate from in order to be allowed into the rest of the game. Instead, each new ability or powerup is gradually introduced throughout the regular flow of the game. Of course, the first few levels all have a bit of tutorial-like instruction to ensure the player knows what to do. However, there are now many more connecting levels in between that allow the player to fully understand and experiment with the abilities they have learned. Eventually a new powerup will be introduced with a brief explanation, but there is no longer any real tutorial section. It won't be until somewhere around level 30 that the player has learned all of the powerups, but even then there are still plenty of other game objects that aren't introduced until later.
I think this was an important change for the game that lets it flow much better, but it has required quite a bit of change to the levels and I'm still working on those changes. So, this week's screenshot does not really show any new graphical changes. What it does show is a level with plenty of moving platforms, a button, a moveable crate, collectable Energy Charges, and it also shows the metal ball in "Boost" mode. Happy Saturday :)
OddBall #screenshotsaturday #6
This entry posted by Graham
in Velvety Couch Games
| Comments (0)
Tags: Game Development, OddBalls, ScreenshotSaturday
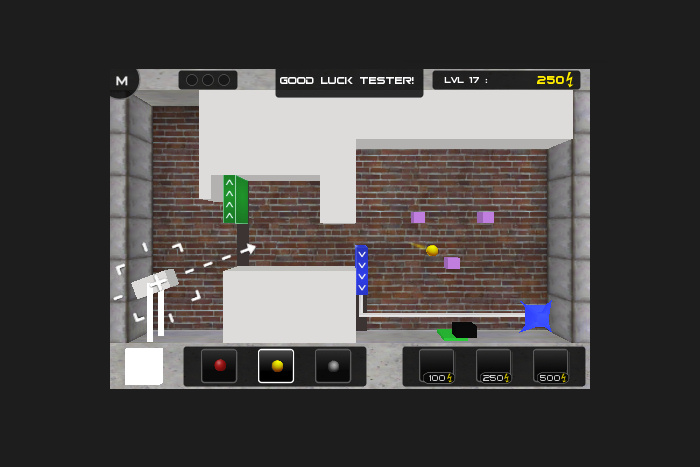
Another Saturday, another screenshot! There's a lot going on in this shot, and it shows a mix of both placeholder art and more finished art. That should give you an idea of where the game is at in development (first 90% is done, working on the last 90%).
Back in screenshot #2 I showed you some coloured platforms that can be triggered by depressing similarly coloured buttons. I've since completed the coloured texture for those platforms and you can see a couple of them in today's snapshot. These platforms take up a very small amount of space on the tiny mobile screens, so I can't really show much detail on them. However, I still wanted to give the player an easy way to see what direction they will move when triggered. So I've used a simple coloured diffuse style for their texture along with white arrows to show the direction they will initially move.
Of course there are also the slide markings along the wall that show what way platforms will move, but the arrows make it even more clear. As simple as these platform textures look, they actually took me a while to complete. There are multiple colours that the platforms can be in the game and I didn't want to make a whole bunch of similar textures that simply had a different colour (this would take up more space in the game's download size and also in memory when running, and performance is always a concern for mobile devices). So I wrote a custom shader that takes a single greyscale texture that can be coloured any colour in code. Additionally, the shader has a cutout mask that can be hidden in the texture's alpha channel that won't be coloured. This allows me to have the white arrows and white outlines on the final texture while the rest of it gets coloured. So you can see how a relatively simple looking platform is actually quite a bit more complicated behind the scenes than you might think. The end result is a simple but sharp looking platform that only uses one texture and can be coloured in any colour dynamically. I'm quite happy with it :)
Another thing this screenshot shows is a "powerline" that goes from the blue target to the blue platform. Blue platforms are special because they are all triggered by the target when the first ball is scored. Afterwards, they will remain in their new triggered position for the rest of the level. Every other platform position can be triggered back and forth with buttons. So, the white powerline you see in this screenshot is another visual way to show the player that the blue platform is connected to the blue target. When the first Oddball is scored, the white powerline turns blue and the blue platform moves. Just a note: the current powerline art and target art is in a half completed state. I still need to texture them.
Next up, you can see a sort of aiming graphic displayed overtop of the (placeholder) cannon. This is a necessary addition because when you play the game on a touch screen your finger/thumb is used to drag the cannon to aim. However, your finger/thumb is covering the cannon while you do this and you can't tell what direction it is pointing without a visual aid. So this aiming graphic is only displayed while you are dragging the cannon and it disappears otherwise.
Lastly, (I told you there was a lot going on in this simple screenshot) I've also been working on juicing up my game lately. What does this mean? Colton Phillips, a local indie game developer, recently tweeted this video link entitled "juice it or lose it". It explains quite succinctly, and with examples, how adding simple polished flair to your game transforms it from what looks like a stale prototype into a finished game. Basically, I've been working on lots of little graphical touches that may seem minimal but they all add up to make the game much more visually appealing and juicy! One of those additions can be seen in today's screenshot which is a bit of a trail behind the yellow sponge Oddball. It's simple, but helps improve the overall look and feel of the game. Next week I hope to show a bunch more of the juiciness I've been adding lately :)
OddBall #screenshotsaturday #5
This entry posted by Graham
in Velvety Couch Games
| Comments (0)
Tags: Game Development, OddBalls, ScreenshotSaturday
Latest Game Creation:
